Back to Maya: Lighting 1
Before I start lighting my environment in the varying styles, I decided to have a little play with a basic light just to get a better insight to what I was up against. I have had quite a bit of experience with lighting in Maya before and already knew the basics in making good renders. For example using functions in Mental Ray like Global Illumination and Final Gathering. Depending on the values of the lights you build in the scene and how you adjust the values of those render functions will affect the quality of the final outcome. Global Illumination and Final Gathering are tools that determine the amount of light and shadow rays in the scene. The higher the setting the most times light information is read. The more it is read the better quality the render and also is more photo-realistic. The only downside with adjusting these settings further is it makes it 'expensive' meaning it takes longer to render as there is so much information being processed.
As a test, I set final gathering to the preset of 100 and turned global illumination to the same preset. I then place a medium size 'area' light and placed it in a corner of my environment. I purposefully made the light face in the opposite direction so I could see how the light would cast shadows. It is also important here to make sure Raytracing shadows is selected and to a minimum setting of 2. In mental ray it will then pick up all reflected shadows cast from other objects, making the quality of the render far more realistic and nice!
Here is a screen of the 'Area' light test:
I actually really liked the outcome of this light. As although the majority of the map is shrouded in darkness, the light being forced out of the small edges of the wall generates really nice illuminations on the surfaces of nearby objects.
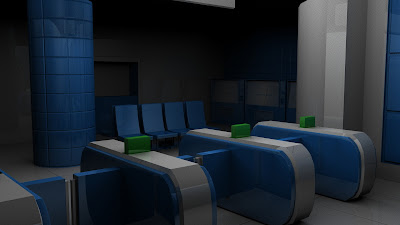
I then moved the area light to a focal point of my environment, just above the ticket terminal machines. I kept the render settings the same just so I could see the effect. Again I was really pleased with the outcome. The Phong material on the terminals cast really nice reflections on accompanying surfaces, as well as some soft shadowing on the floor beneath.
I then decided I wanted more of my room to light up. Naturally I just increased the size of the Area light to cover more space of the scene. However, when I rendered the scene out, it was very grainy. I did some research and discovered it was pretty much like how we stretch an image. The more we stretch a picture without adjusting the DPI settings, the blurry and more distorted it becomes. In this circumstance, the Area light needs more 'light' information set to it so it can correctly illuminated the larger space. This can be done by adjusting the sampling settings in the mental ray settings. Or you can adjust it by using a higher final gather and global illumination setting. Although this is where things start to get 'expensive' when rendering. From this simple play test, I actually discovered something very important. That depending on the type of light, it's properties and size need to be taken into account before rendering. As settings will need to be altered in order to collect the right light information. I think for the 'main' light in my scene, I will not use an Area light based on the graininess. I want to avoid increasing settings to very high levels, especially if I can find a better and more effective alternative.


No comments:
Post a Comment